Integration with Radicle

The main feature introduced by Kraken version 1.7 is integration with Radicle, a peer-to-peer code collaboration stack.
Radilce leverages Git’s architecture combined with cryptography and a gossip protocol to enable a fully sovereign developer network. Unlike centralized platforms like GitHub, there is no single entity controlling the network or user data. Repositories are replicated across peers in a decentralized manner. More details about Radicle can be found it its Guides.
To arrange a CI process for Radicle there must be appointed Radicle server that will be used by Kraken CI server so:
- Kraken CI server can listen for webhooks coming from that Radicle server
- Kraken CI can provide links that lead to repositiories, commit changes, etc from Kraken CI web UI.
The configuration on Kraken CI side is described in Webhooks guide.
The details about setting up Radicle side are presented below. This description is heavily based on the documentation Radicle CI Integrations.
Integrating a CI system using Radicle Webhooks
In order to add the desired webhook functionality, expected by Kraken CI, there must be run the Radicle CI Broker alongside the Radicle Node. Radicle CI Broker is responsible for grabbing any events that the Radicle Node generates and for each event it invokes the Radicle Webhooks Adapter that will invoke any registered outgoing webooks.
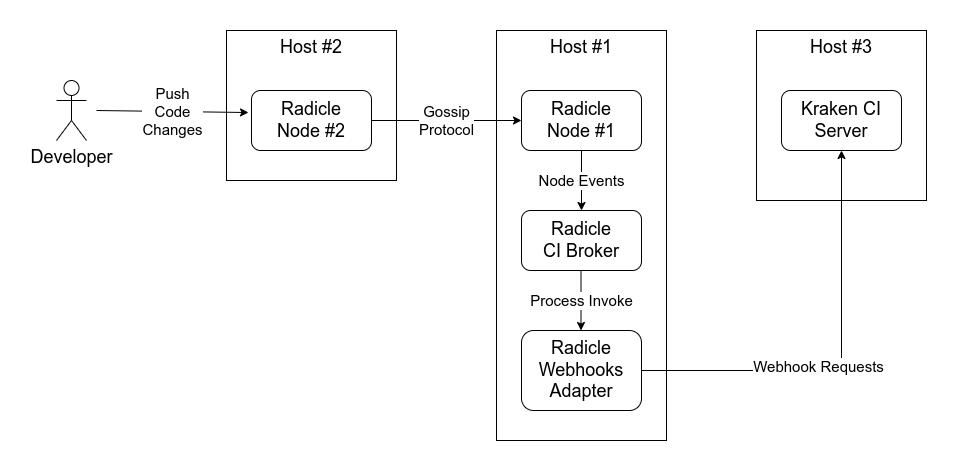
The second Radicle Node is required so that the first one can receive any updates from the network and then generate events so the broker will spawn any registered adapter.
Making changes to a node wont generate any events to the same node.
Radicle Setup
The setup requires a Radicle Node that will be running alongside the Radicle CI Broker and the Radicle CI Broker that will invoke the webhooks adapter.
Another Radicle Node is required with network access to the previous one (through private, public IP - or even in the same host) that will make changes to a repository. This way the first node will generate events about the changes that the broker will grab and invoke the webhook adapter.
Radicle Nodes
Radicle must be set up following one of the official installation
methodologies from: https://radicle.xyz/#get-started. After the Radicle
installation the rad auth command must be executed. More details
about rad auth can be found
here.
After this you will be able to start your node by running
rad node start. At this point we all set!
You can run radicle-httpd and rad web so that you can access your
Radicle Node through the web interface. radicle-httpd provides an
HTTP API for managing the Radicle Node. rad web authenticates the
Radicle Node using the radicle-httpd towards
https://app.radicle.xyz/ so that users can manage their node through
the web client.
Web client and API offers a subset of functionality compared to the rad cli.
You are able to setup and run more Radicle Nodes in the same host by
altering the Radicle's home path through the RAD_HOME environment
variable. So you can set up a new node using the
RAD_HOME=~/.new_radicle rad auth. For the rad web you can provide
the radicle-httpd URL to connect to rad web https://app.radicle.xyz --connect 127.0.0.1:8080.
So in order to setup two nodes in our host we have to run:
# Primary Node
rad auth
rad node start
radicle-httpd
rad web  # optionally append with: https://app.radicle.xyz --connect 127.0.0.1:8080
For the second node use
# Secondary Node
RAD_HOME=~/.secondary_radicle rad auth
RAD_HOME=~/.secondary_radicle rad node start
Radicle Webhooks Adapter
As mentioned earlier, the Radicle CI Broker is responsible for grabbing the Radicle Node events and then invoke any registered adapter for any event. An adapter is responsible for conducting any tasks.
In our case, the Radicle Webhooks Adapter is responsible for invoking any registered webhooks when an event occurs.
The Radicle Webhooks Adapter binary does not run as a stand alone application. Radicle CI broker is responsible for spawning it with the appropriate input data.
Radicle Webhooks Adapter read the webhook configuration from the repository that the radicle node event occurred.
The Radicle Webhooks Adapter binary must have appropriate execute permissions.
The configuration that the adapter requires is:
| EnvVar | Description | Default Value |
|---|---|---|
WEBHOOKS_RETRIES | Total attempts until get a successful response. | 3 |
WEBHOOKS_TIMOUT_SECS | Timeout for webhook request. | 30 |
RAD_HTTPD_URL | URL of radicle's HTTPD. | "127.0.0.1:8080" |
RAD_BROWSE_URL | Public URL of a radicle seed to browse repositories. | "app.radicle.xyz/seeds/$RAD_HTTPD_URL" |
RAD_HOME | Path for radicle home directory. | "~/.radicle" |
RAD_PASSPHRASE | Passphrase for the radicle key. | "" |
WEBHOOKS_DB_PATH | Path for the SQLite DB to store webhooks results. | "./webhooks-adapter.sqlite" |
More details about the radicle wbhooks adapter can be found at its repository.
Radicle CI Broker
The Radicle CI Broker is responsible for reading events from the Radicle Node and invoke any registered adapter. Radicle CI Broker must be initiated and run at the background at all times in order to grab and process any new event from the Radicle Node. In our setup we should connect Radicle CI Broker to our primary node ie. #1.
The configuration of the broker should be stored in a .yaml file as follows:
$ cat ci-broker-cfg.yaml
default_adapter: webhooks
adapters:
  webhooks:
    command: radicle-webhooks-adapter
    env:
filters:
radicle-webhooks-adapter should be replaced with the full path of
the Radicle webhooks adapter binary path.
Then the broker can be initiated through the command:
RUST_LOG=debug ./ci-broker ci-broker-cfg.yaml
ci-broker-cfg.yaml is the path of the yaml file that contains the broker's configuration.
More details about the Radicle CI Broker can be found at its repository.
Repository Setup
Now that Radicle Primary Node with CI Broker is in place we have to properly setup our repository. We can choose to set it up to any of the available Radicle Nodes but we should seed it through the node that runs the broker.
Now it's time to initialize a Git repository. This will be done in our
secondary node ie. #2. We do it as a normal Git repository through git init
and then we should initialize it as a rad repository through
RAD_HOME=~/.secondary_radicle rad init.
For more details about how to initialize a repository you can check this example.
Repository should contain the configuration for the webhooks. This
file should be stored under the .radicle/webhooks/ directory in our
repo. Each configuration file should be a .yaml (or .yml) that
will contain all the details for each webhook. The schema of the
file's content is like this:
outgoing_webhook_kraken_ci:
    payload_url: https://kraken-server/webhooks/25/radicle
    content_type: application/json
    shared_secret: <some-secret>
outgoing_webhook_kraken_ciis the friendly name of the webhook;payload_urlis the URL that will be invoked when an event occurs, e.g.https://kraken-server/webhooks/25/radiclewherekraken-servershould be replaced with real Kraken CI Server address and 25 with appropriate project ID in Kraken CI;content_typeis the content type of the payload (currently onlyapplication/jsonis supported);shared_secretshould be a high entropy secret key used to generate the SHA-256 hash signature using HMAC hex digest from the provided webhook's secret token alongside each payload. This result will be within the headers of the webhook request so that the recipient will be able to validate the request.
Multiple webhook configuration files are supported within the
repository using multiple files or separating the entries using the
three dashes ---. As a user stores all the webhooks' details within
the repository these details must be somehow hidden to the rest of the
users. So, these configuration files should be encrypted in order to
ensure that the configuration data are not exposed.
In order to encrypt these files we should use the age file encryption tool. This tool permits the encryption of a file using multiple public keys and the decryption of each file using just one of the private keys. After the age tool is installed you can encrypt each file using the following command:
age -encrypt -R radicle1.pub -R radicle2.pub -R radicle3.pub -o destination_for_encrupted_file.yaml file_to_encrypt
The -R radicleX.pub is added for every public key we want to encrypt
the file with. It is completely fine to use one or more keys. The keys
that should e used are the radicle public/private keys located at
$RAD_HOME/keys/ directory. We should encrypt the webhooks settings
using the keys of the users that we permit to be able to view and
propose changes to these settings. We should definitely use the key
that the webhooks adapter will use in order to decrypt the webhooks'
settings files. This key is located under the $RAD_HOME and it's
passphrase should be at $RAD_PASSPHRASE.
The destination_for_encrupted_file.yaml is the file that should be
committed to the repo. It's critical here to use the public key of the
radicle node where the Radicle CI Broker runs in order to allow the
adapter to decrypt it later.
For more details and examples for this process you can refer to the radicle-webhooks-adapter documentation.
For this setup there is no reason to follow the steps under the
Automated encryption & decryptionsection but feel free to do so!
Now that we have our repository ready we have to ensure that the
radicle node that runs alongside the broker (the primary node) is
seeding the repository. Seeding a repository means that the Radicle
node will seed that repo in the Radicle p2p network (as we seed in
torrents). This can be done either by cloning the repo through the
rad clode RAD_ID command or the rad seed RAD_ID command at the
primary node (where the broker runs). RAD_ID is the repo's radicle
ID. This can be retrieved through the rad ls command or by running
the rad . command within the repository's folder.
By seeding a repository we ensure that the a node receives any events for the specific repo.
Testing
We can now check our setup if everything works fine. On the Host #1 we should start the Radicle Node and the CI Broker. The broker will report some logs:
 Running `./ci-broker webhooks`
 INFO  ci_broker > Radicle CI broker starts
 DEBUG ci_broker > loaded configuration: Config {
    default_adapter: "webhooks",
    adapters: {
        "webhooks": Adapter {
            command: "/tmp/bin/radicle-webhooks-adapter",
            env: {},
        },
    },
    filters: [],
}
 INFO  radicle_ci_broker::event > subscribing to local node events
You can use a webhook listener service (such as the https://webhook.site/) in order to register the provided URL and check the requested payload alongside any headers.
Push
From the secondary node we should push some changes to the repo. Pushing will automatically sync with other nodes and will print something like in the broker's log output:
$ git push
✓ Patch b1d3420 updated to 54884569f96ac1db8ea1fb19004a536bb6e0ab83
✓ Synced with 2 node(s)
To rad://z32iyJDyFLqvPFzwHm8YadK4HQ2EY/z6MksMpnzPF48pk4XAnqVotKmfs2SE3bxA57UA8KL9DnWnY3
   a680e4d..6a76ee5  ha -> patches/b1d3420337dc4817cb9f2c2a0320e60b11530a25
If the sync fails we can retry it through the
RAD_HOME=~/.secondary_radicle rad sync command. A successful sync
will generate some events to the broker.
If the webhook configuration is properly set up we can see in the logs
the webhook URL printed out. We can see that we will receive two
events from the broker which will make our broker invoke the webhooks
for these two events. One event will be about the update of the
sigrefs and the other one is for the actual push event on the repo.
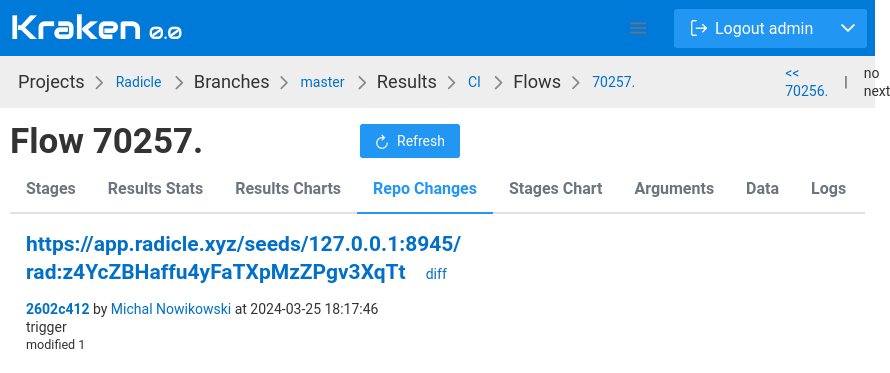
And then in Kraken CI side we should see a triggered flow in a project
associated with the repositored hosted in Radicle. On the flow page,
in Repo Changes, there are information retrieved from Radicle Push
event. We can visit hosted Git repo in Radicle or visit the change commits.